









أنتم تأتمنون مورداً على أسطح مئات الشقق. ما الذي يمنحكم الثقة؟
معظم هذه المخاطر تأتي من ضعف ضبط العملية. عندما تكون للعملية نقاط تحقق مدمجة، يمكن إبقاء المخاطر قريبة من الصفر. وعندما تعتمد العملية على أن يراقب الناس بعضهم فقط، قد تظهر المخاطر في كل خطوة.
ماذا يحدث عندما يُختار مورد أسطح غير مناسب لمشروع 200 وحدة سكنية؟ عرض سعر خاطئ أو أبعاد غير صحيحة أو فتحات أحواض في غير موضعها أو تعبئة ضعيفة أو شحن متأخر أو لا أحد للاتصال عند وقوع مشكلة. كل مشكلة تصبح تكلفة حقيقية: إعادة عمل وتوقف وشكاوى عملاء وتأخير المشروع.
كل ما في هذا الدليل من إجراءات التشغيل الداخلية. يغطي إعداد العرض ومراجعة الرسومات وتأكيد الطلب وفتحات الأحواض وإدارة التغيير والتعبئة وتحميل الحاوية والفحص قبل الشحن. نشارك هذه العمليات لتكون لديكم قائمة عملية لمنع الأخطاء عند تقييم الموردين.
أرسلوا رسومات المشروع والمتطلبات إلى المورد واطلبوا عرض سعر.
Missing items lead to extra charges later. An unclear quote can also result in the wrong product arriving on site.
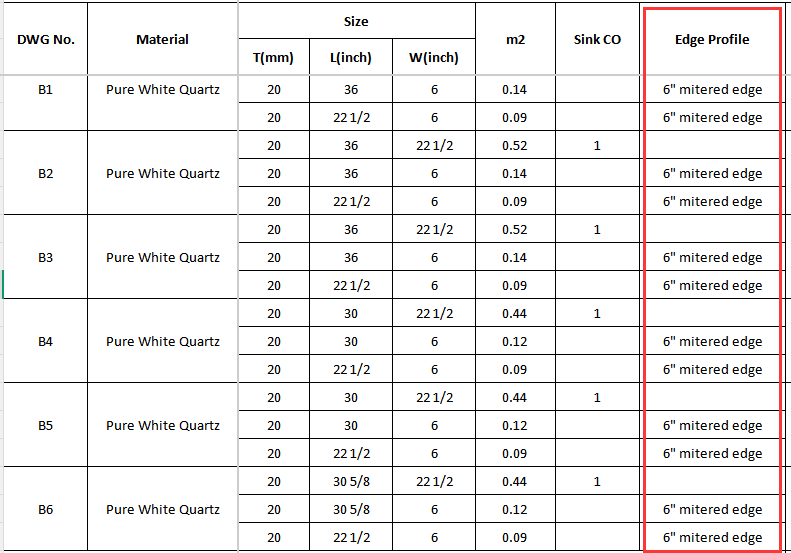
يتضمن كل عرض سعر للعميل 10 بنود مطلوبة. ويمكن التحقق من كل واحد:
أدرجوا صوراً فعلية للمنتج حتى يمكن تأكيد النقش واللون.
3 cm slabs are clearly marked in yellow for easy identification.
Clearly describe the edge profile with photos or written codes.
اعرضوا العدد الإجمالي للأطقم حتى يمكن التحقق سريعاً من النواقص.
اذكروا عدد كل فتحة وموقعها بناءً على الرسومات.
State clearly whether they are included.
Clearly state whether these are included where applicable for granite countertops.
إجمالي المساحة بالأقدام المربعة والوزن الإجمالي وعدد الحاويات والقيمة الإجمالية ومتوسط السعر.
قدّموا سعراً مرجعياً لإعداد الميزانية.
نقدّم تكلفة مرجعية حتى تقدّروا التكلفة الواصلة الفعلية.
كل بند يظهر بصورة ونص. هذا يجنّب الاعتماد على الاتفاق الشفهي. تظهر الكمية كعدد إجمالي للأطقم، لا كبنود فقط، فيسهل التحقق في الموقع.
فيما يلي عرض سعر لمشروع حقيقي يوضح كيف يعمل التنسيق.
الشكل 1-1. تفاصيل عرض سعر حقيقي: الحجر وأبعاد اللوح وبروفايل الحافة وفتحات الأحواض بنداً بنداً.
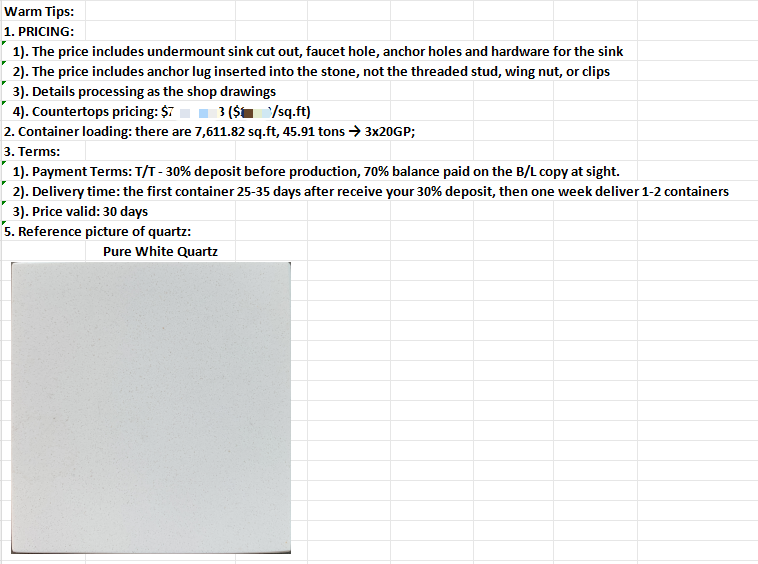
الشكل 1-2. شروط العرض (ملاحظات): نطاق العمل وخطة التحميل وشروط الدفع والتزام مهلة التوريد.
عرض سعر يمكن مراجعته بنداً بنداً. ويصبح أيضاً قائمة التحقق التي نوائم بها متطلباتكم. ما يُتفق عليه أثناء التسعير أقل احتمالاً أن يصبح تكلفة إضافية أو نزاعاً لاحقاً.
أرسلوا رسومات المشروع. قد تأتي من مكتب تصميم أو رسوماً يدوية، لذا يختلف مستوى التفاصيل.
قد تخلو الرسومات من الحجر أو السماكة أو بروفايل الحافة أو أبعاد فتحة الحوض. إذا بنى المورد مباشرة من رسومات ناقصة، فقد تدفعون ثمن الخطأ.
قبل إصدار الطلب، يراجع فريقنا الفني كل رسم للعميل ويوحّده ويعيد رسمه كرسم إنتاج قياسي.
نكمل الحجر والسماكة (بما في ذلك المطبخ مقابل الحمّام واللوح الرئيسي مقابل سماكة خلفية الحائط) وبروفايل الحافة (مثل EASED أو MITERED أو LAMINATED) وارتفاع الخلفية وتفاصيل المواد الأخرى.
نكمل المسقط والواجهات والمقاطع والأبعاد الدقيقة.
نوحّد أرقام الرسومات وأرقام الصفحات والمقاييس لتسهيل الفحص في الموقع.
نضيف بيانات تتبع مثل اسم المشروع والعنوان واللون ورقم الطلب.
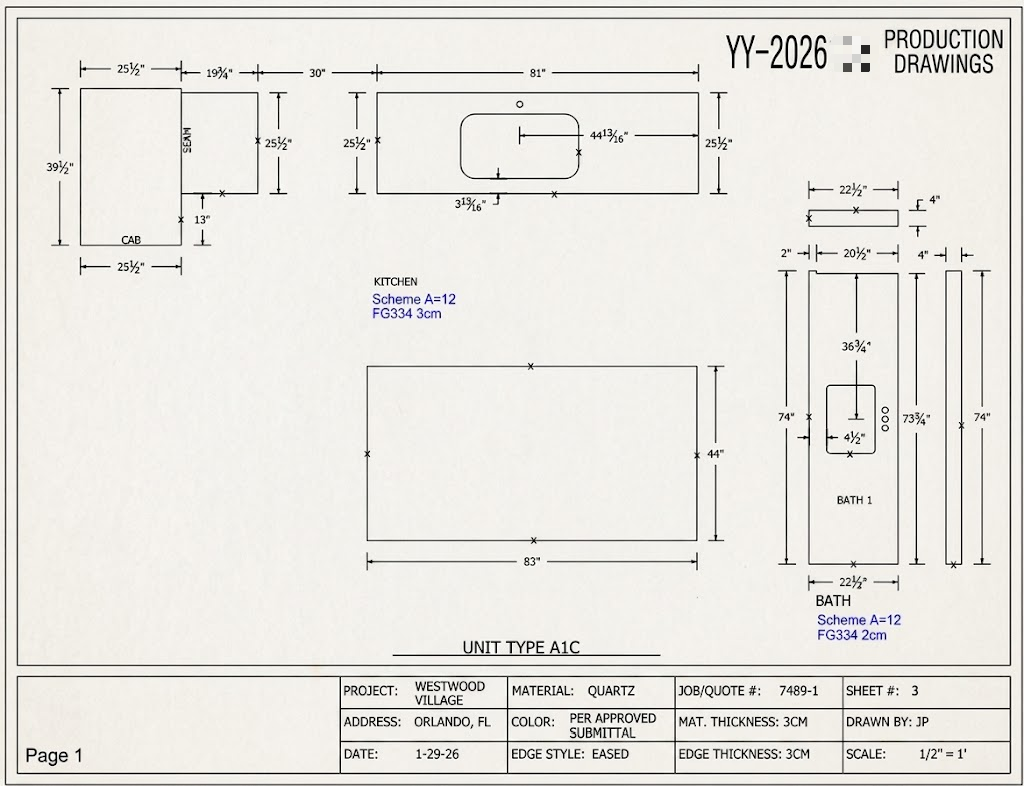
Standardization does not change your design. It removes unclear points before production starts. The shop builds from the approved production drawing. There is no “I thought you meant this.”
رسم إنتاج يطابق تصميمكم 100%، مع توحيد احترافي للرسومات دون رسوم إضافية.
الرسمان أدناه من المشروع نفسه. الأيسر رسم العميل الأصلي. والأيمن رسم الإنتاج الموحّد لدينا.
الشكل 2-1. رسم العميل الأصلي: المعلومات الناقصة تخلق مخاطر إنتاج.
Figure 2-2. Standardized production drawing: materials, dimensions, edge profiles, and drawing numbers are clearly marked.
تخطيط السطح الكلي والأبعاد الكلية وفتحات الأحواض ومواقع فتحات الصنبور.
ارتفاع خلفية الحائط والألواح الطرفية والحشوات وارتفاع القاعدة وتفاصيل رأسية أخرى.
سماكة السطح وبروفايل الحافة ووصلات المكوّنات.
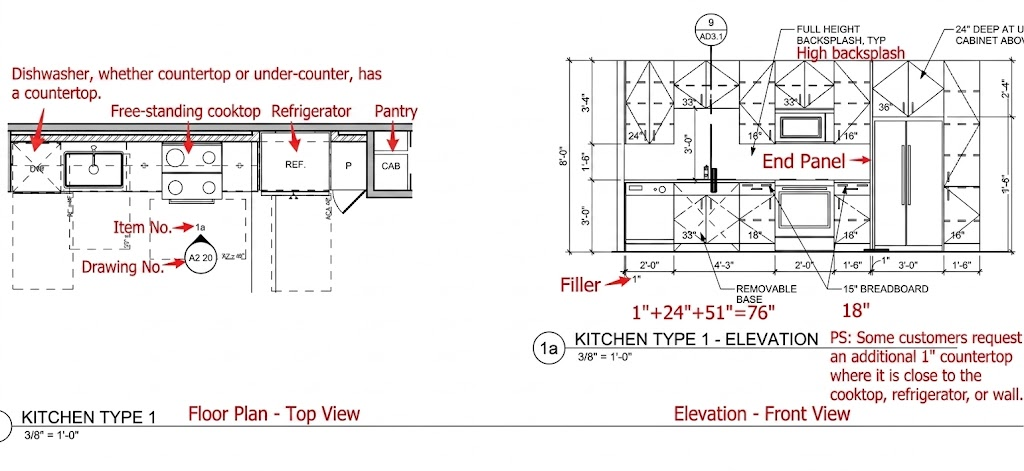
الشكل 2-3. مسقط سطح المطبخ + الواجهة (مع تحديد غسالة الصحون والموقد والثلاجة ومواقع أخرى).
Figure 2-4. Countertop cross-section: thickness and edge details are clearly shown (“All edges eased, miter joint at seams”).
الشكل 2-5. مقطع الخزانة والسطح: تفاصيل الربط.
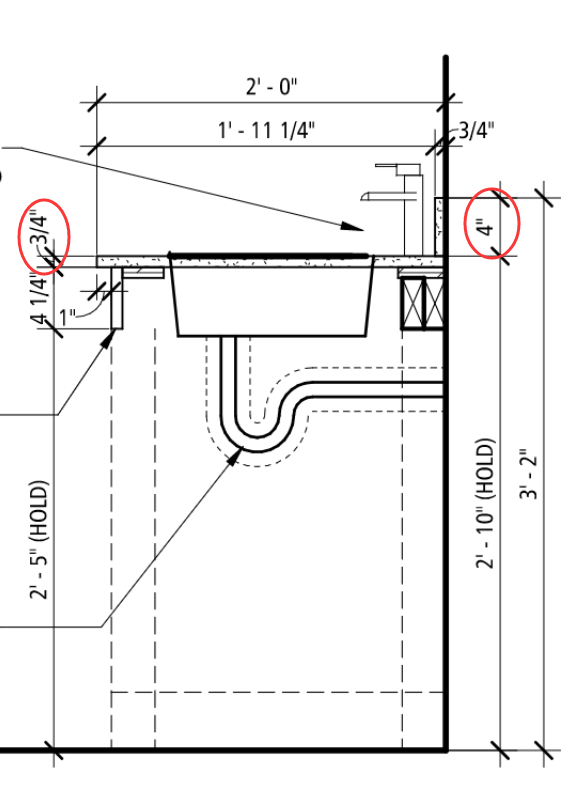
الشكل 2-6. مقطع سطح مغسلة الحمّام وفتحة الحوض.
أكّدوا تفاصيل الطلب واستعدوا لإصداره.
The color does not match. Faucet holes are in the wrong place. Sink setbacks are unclear. Packaging is not confirmed. Any missed detail can mean rework and delay.
قبل الطلب، نضع كل تفاصيل السطح الأساسية في قائمة ثابتة ونؤكد كل بند معكم كتابةً:
راجعوا كل تفصيل في الرسومات بعناية.
أكّدوا مرة أخرى قبل الطلب أن عيّنة اللون معتمدة ومطابقة.
العدد والمقاس والتباعد.
أكّدوا أن رمز الرسم يطابق تفصيل الحافة الفعلي.
أكّدوا الارتداد المطلوب برسم تعدّه فريق اللوجستيات لدينا.
أكّدوا ما إذا كانت المواضع القياسية أو الخاصة مطلوبة.
التعبئة حسب الطقم أو حسب المقاس.
يؤثر مباشرة في جدولة المصنع وتركيب الموقع.
يُستخدم لتخطيط الإنتاج والشحن بالرجوع من التاريخ المطلوب.
Once the order is placed, the details are locked. Both sides have a clear understanding of the final result. There is no room for “I thought you knew.”
حدّدوا طراز الحوض والصنبور وأدرجوا متطلبات الثقوب في الطلب.
فتحة خاطئة قد تمنع تركيب الصنبور أو الحوض. وعندما تُكتشف المشكلة قد يكون السطح وصل إلى الموقع.
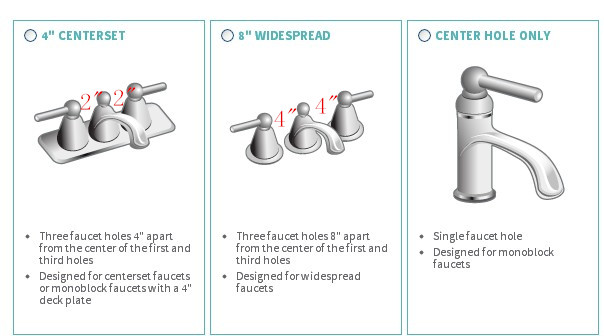
فتحات الصنبور: ثلاثة خيارات شائعة للمطابقة الدقيقة.
الشكل 4-1. ثلاثة تكوينات شائعة لفتحات الصنبور: centerset 4 بوصات / widespread 8 بوصات / فتحة مركزية فقط.
Centerset بمسافة 4 بوصات
الثقبان الخارجيان متباعدان 4 بوصات، لصنابير centerset.
Widespread بمسافة 8 بوصات
الثقبان الخارجيان متباعدان 8 بوصات، لصنابير widespread.
فتحة مركزية فقط
فتحة واحدة لصنبور بثقب واحد.
يكون الصنبور والحوض جاهزين للتركيب عند وصول السطح إلى الموقع. بلا إعادة عمل. وبلا ألواح بديلة.
فتحات الأحواض: تُقص من قالب الحوض الفعلي.
نلتزم بقاعدة واحدة: فتحات الأحواض تعتمد على قالب الحوض الفعلي، لا على تقدير أبعاد الرسم فقط. المثال أدناه من مشروع حقيقي ويُظهر الأبعاد الدقيقة لأحواض المطبخ والحمّام.
الشكل 4-2. أبعاد فتحات أحواض المطبخ والحمّام («فتحات الحوض تتبع قالب الحوض الفعلي»).
الشكل 4-3. خيارات فتحات أحواض ADA / القياسية / الحمّام، بالأبعاد بالبوصة والمليمتر.
الشكل 4-4. سطح على شكل L: مسافات دقيقة من الحافة الأمامية إلى فتحات الحوض والصنبور.
أكّدوا تخطيط الثقوب على رسم CAD أولاً. استخدموا القالب الفيزيائي أثناء القص. اعرضوا الوحدتين لتقليل أخطاء التحويل.
تغيير الأبعاد أو استبدال حوض أو تعديل التعبئة أو تغيير تاريخ التسليم أثناء الإنتاج. هذا شائع في أسطح المشاريع.
A change may be missed and the shop may build from an old drawing. If something goes wrong, it may be unclear who changed what or when.
كل تحديث للتفاصيل في طلب هندسي يُسجَّل ويُستخدم مرجعاً للإنتاج.
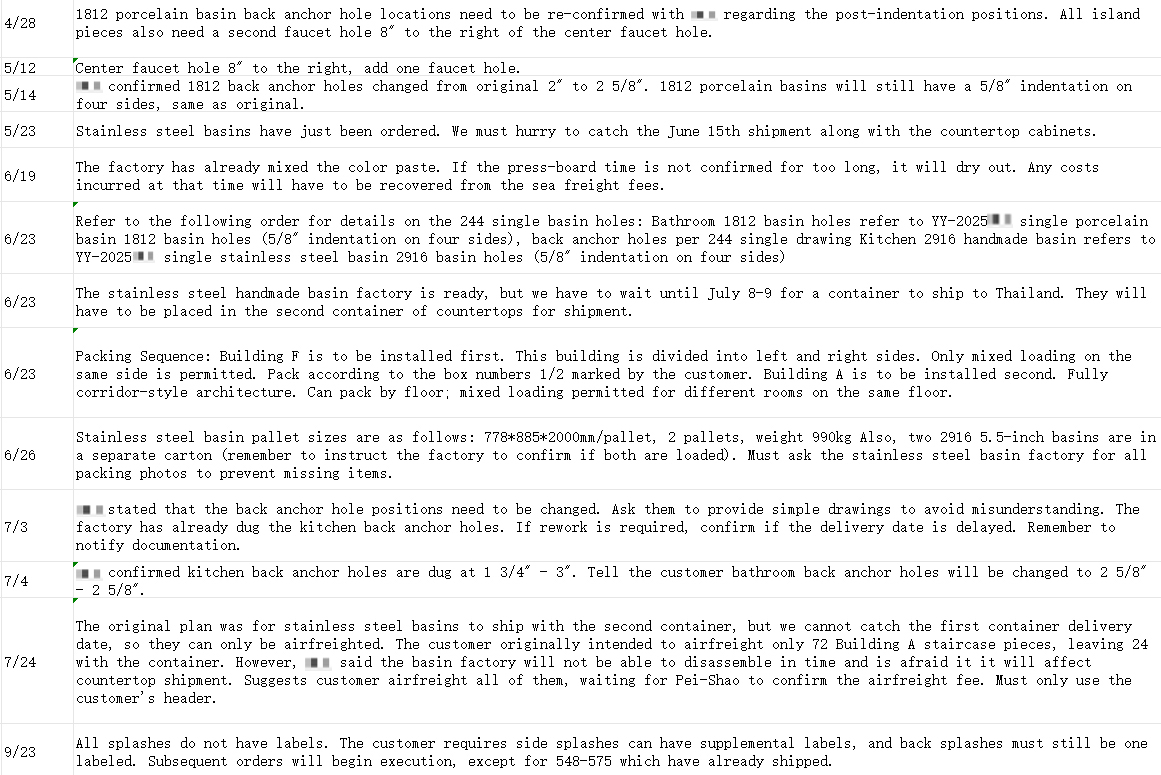
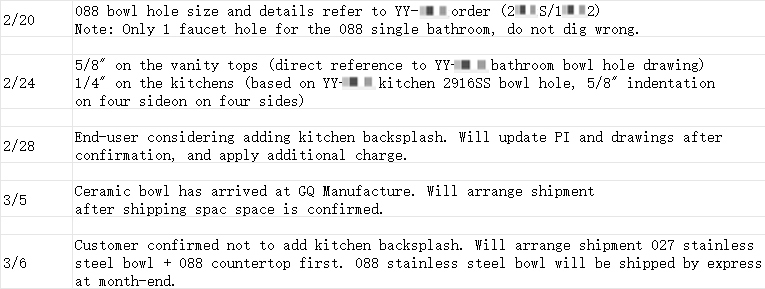
مجموعات لقطات الشاشة الثلاث أدناه من سجلات تغيير لمشاريع حقيقية. تُظهر كيف تُوثَّق كل مراجعة.
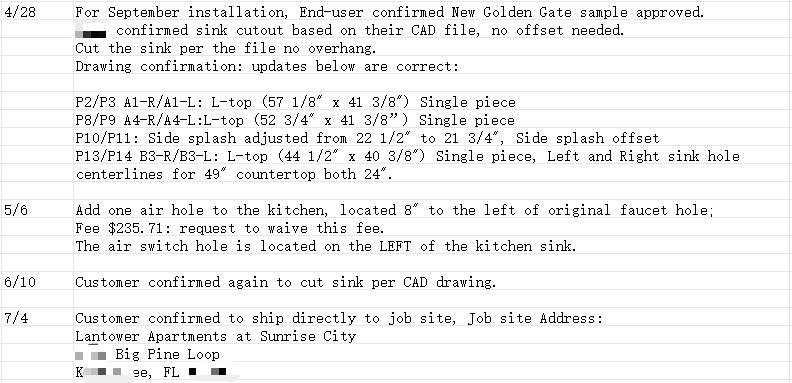
الشكل 5-1. سجل التغيير 1: تغيير الحجر وتعديلات المقطع وارتداد خلفية الحائط الجانبية وإضافة فتحات تهوية.
الشكل 5-2. سجل التغيير 2: تأكيد ارتداد الحوض، وتغيير دفعات الشحن، وأبعاد الطبالي، وغير ذلك.
الشكل 5-3. سجل التغيير 3: مرجع الحوض وتفريز فتحة الصنبور وإضافات أو إلغاءات خلفية الحائط وغير ذلك.
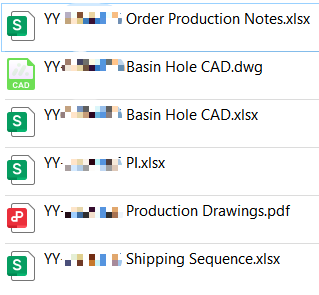
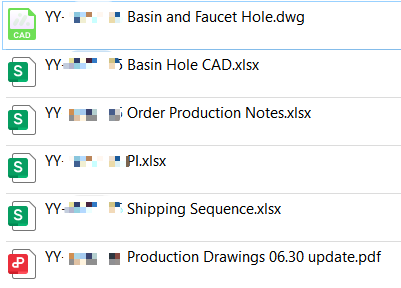
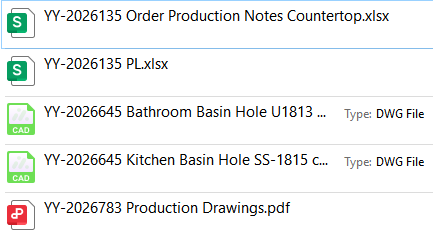
إدارة الوثائق: لكل طلب ملف مستقل، بلا التباس في النسخ.
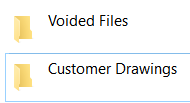
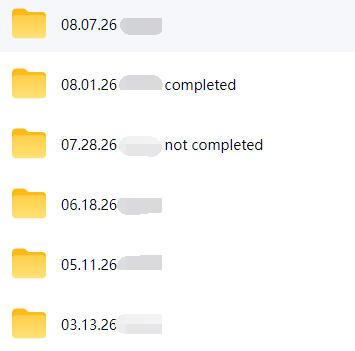
لكل طلب مشروع مجموعة ملفات خاصة. تُحفظ عروض الأسعار (PI) ورسومات CAD للأحواض ورسومات الإنتاج وملاحظات الإنتاج وقوائم تسلسل الشحن حسب الفئة. تُسمّى الرسومات المحدّثة بالتاريخ. وتُنقل النسخ القديمة إلى مجلد «ملفات ملغاة» حتى لا تستخدم الورشة النسخة الخطأ.
الشكل 5-4. ملف الطلب: عرض السعر / تسلسل الشحن / CAD الحوض / رسومات الإنتاج / الملاحظات.
الشكل 5-5. رسومات منظّمة حسب النسخة والتاريخ.
الشكل 5-6. مجموعة ملفات كاملة لمشروع كبير.
الشكل 5-8. الملفات الملغاة ورسومات العميل تُحفظ بشكل منفصل.
الشكل 5-7. ملفات مؤرشفة حسب التاريخ، مع حفظ النسخ الملغاة بشكل منفصل.
انتظار الشحن ثم توزيع الأسطح على كل طابق ووحدة بعد التسليم.
تصل مئات القطع مختلطة. لا يجد فريق الموقع القطع المناسبة لكل مبنى، ويتوقف التركيب.
نتبع خطة التعبئة التي تحددونها إن وُجدت. وإلا نستخدم نظام تعبئة متدرجاً:
أولاً، التجميع حسب المبنى.
ثم التقسيم حسب الطابق.
داخل كل طابق، تُفصل القطع حسب المقاس (القطع العالية والمنخفضة تُعبأ منفصلة).
أبقوا قطع المطبخ منفصلة عن قطع الحمّام.
علّموا رقم الطلب ورقم القطعة ونوع اللوح على الوجه الخارجي لكل طرد.
تراعي خطة التعبئة سلامة النقل وكفاءة الحاوية معاً. إذا كانت التعبئة المطلوبة تزيد عدد الحاويات، نشرح ذلك أولاً ونقترح خياراً أكفأ. يبقى الاختيار لكم. ونتحمّل مسؤولية المخاطر.
يمكن توزيع القطع وتركيبها حسب الملصق في يوم الوصول. لا حاجة لفرز ثانٍ.
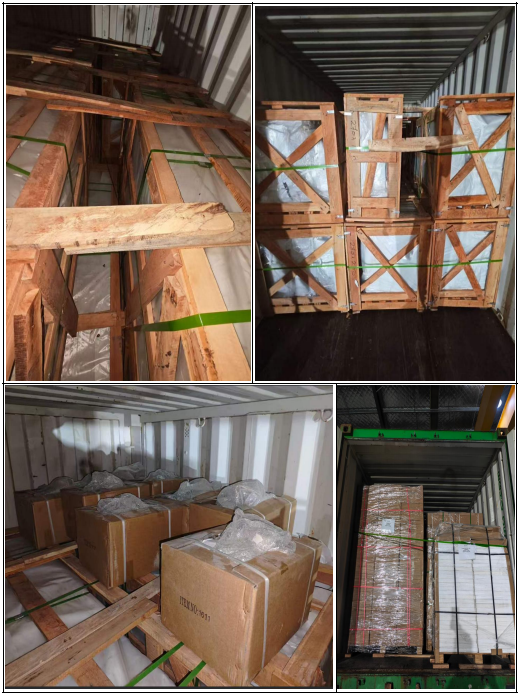
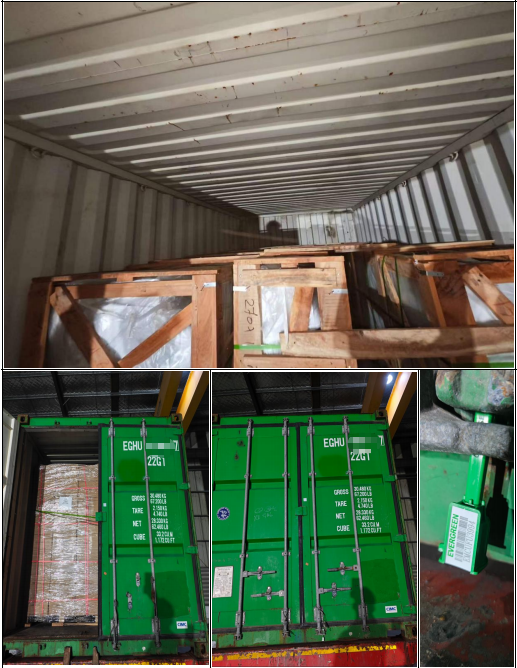
تحميل الحاوية عملياً:
الشكل 6-1. تحميل الحاوية بدعم إطار خشبي وتعبئة كرتون.
Figure 6-2. Sealed container: container number, net weight, and volume clearly recorded for full tracking.
القطع الكبيرة والثقيلة
حوامل خشبية على شكل A + أشرطة فولاذية.
الأسطح المتوسطة والصغيرة
تعبئة كرتون مباشرة + تقوية بأشرطة فولاذية.
بعد ختم الحاوية، نضع عليها رقم الحاوية والوزن الصافي والحجم وبيانات أخرى مطلوبة. تبقى الشحنة قابلة للتتبع طوال العبور.
استلموا الشحنة ونسّقوا الفحص.
لا تُكتشف أخطاء الأبعاد أو عيوب السطح إلا بعد التسليم، فتأتي المطالبات وتأخير التركيب.
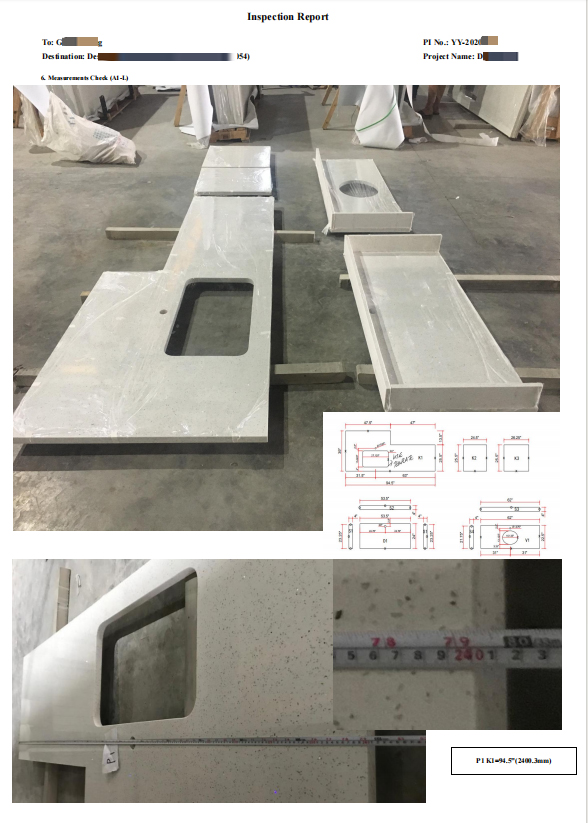
تُفحص كل دفعة أسطح قبل الشحن، مع تقديم تقرير فحص:
يرافق تقرير الفحص الشحنة. يمكنكم الفحص عند الاستلام دون وقت إضافي لإعادة القياس من طرف ثالث.
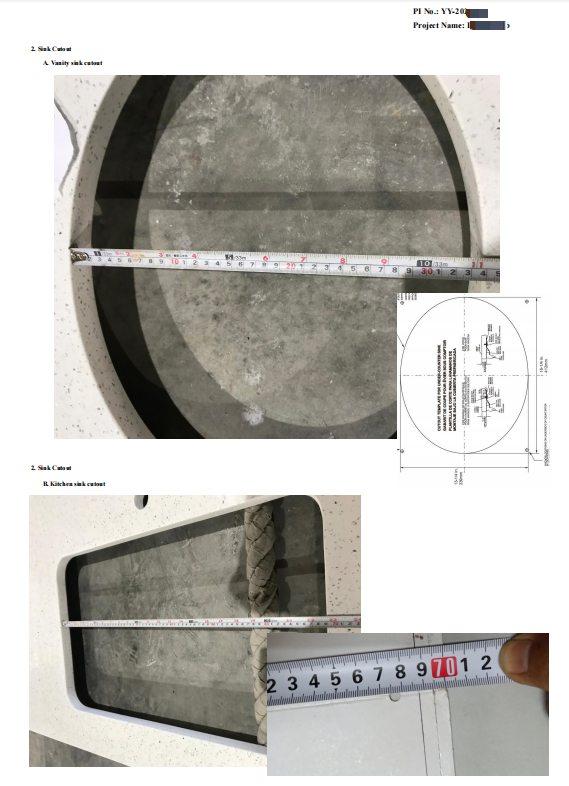
سجلات فحص حقيقية:
الشكل 7-1. أبعاد فتحة الحوض المقاسة ومقارنتها برسومات CAD.
الشكل 7-2. تقرير فحص الأبعاد الكلية والمظهر.
أبعاد فتحة الحوض — تُقاس بالشريط وتُراجع بنداً بنداً مقابل رسومات CAD.
الأبعاد الكلية — الطول والعرض والسماكة تُراجَع مقابل رسومات المقطع.
المظهر — تُفرد القطع وتُصوَّر. وتُراجع تفاصيل السطح والحافة.
يكتمل الفحص في المصنع، فتُحسم المشكلات قبل التحميل. لا نسمح بخروج القطع موضع الشك من الورشة. هذا ما يعنيه لنا «جاهز للشحن».
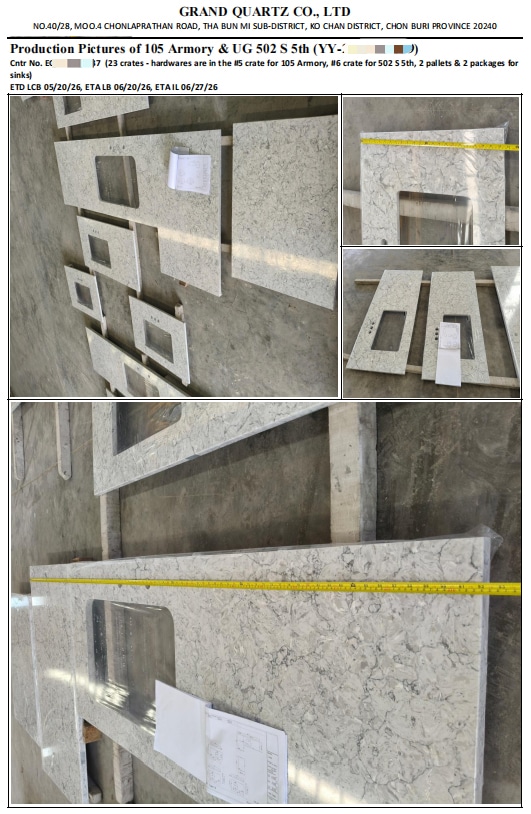
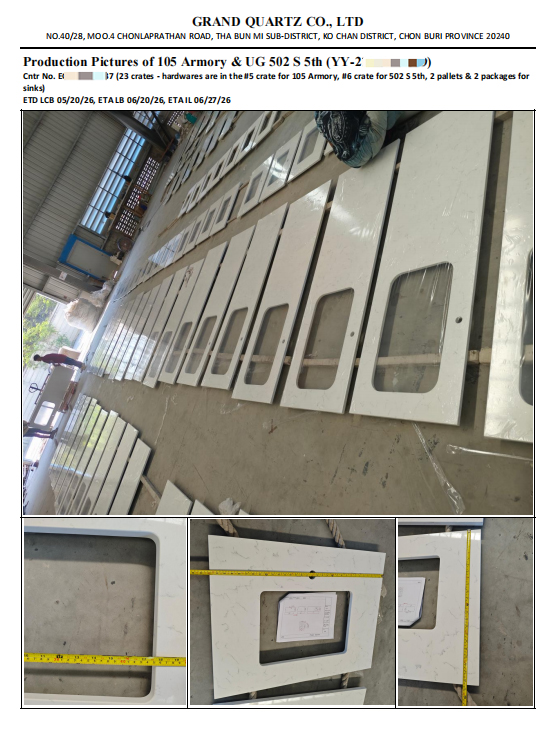
أوضح طريقة لتقييم المورد هي رؤية أرضية الإنتاج. الصور أدناه من إنتاج مشاريع حقيقية في مصنع Grand Quartz في تشونبوري بتايلاند. كل قطعة ظاهرة مرّت بالعمليات المذكورة في الفصول السبعة الأولى.
الشكل 8-1. إنتاج أسطح الكوارتز: ألواح مخزّنة بترتيب مع ملصقات ضبط جودة كاملة.
الشكل 8-2. إنتاج أسطح الكوارتز: اكتملت فتحات الأحواض وحواف الحواف، وجاهزة للتعبئة والشحن.
اتساق اللون في مشاريع الدفعات — مشروع واحد، لون واحد، مخرجات متسقة
من أكبر مخاوف أسطح المشاريع أن العيّنة تختلف عن الطلب بالجملة. الرسمان الحقيقيان أدناه يُظهران حجراً متسقاً وتركيباً مركّباً ومعالجة حافة عبر وحدات مختلفة في المشروع نفسه، ما يساعد على إبقاء الأسطح متسقة في المبنى.
الشكل 8-3. رسم مشروع كوارتز Calacatta Arno (تركيب مصفّح 3/4 بوصة + 3/4 بوصة، حافة X Ease ومصقول).
الشكل 8-4. رسم مشروع كوارتز Rolling Fog (لون متسق داخل المشروع نفسه).
①
تعمل GQ في صناعة الحجر منذ 37 عاماً، ولديها مصنع في تشونبوري بتايلاند.
②
شهادة NSF لسلامة ملامسة الطعام واختبارات جودة SGS.
③
عروض الأسعار والرسومات وتأكيدات الطلب وسجلات التغيير وتقارير الفحص كلها قابلة للتتبع.
④
Each order has a clear point of contact and a process for handling issues.
⑤
نقدّم حلاً مقترحاً خلال 24 ساعة من استلام البلاغ.
⑥
نقدّم مراجع الشحن البحري وتحميل الحاوية وتتبع الشحنة.
كوارتز موثوق
مصنع منذ عام 1989.
فريقنا متاح على مدار الساعة طوال أيام الأسبوع.